How to Safeguard File Access on S3 through CloudFront
Written on
Understanding Secure Access to S3 Objects via CloudFront
Amazon S3 stands out as one of the most compelling services offered by AWS, providing virtually limitless file storage with minimal monitoring and maintenance. Unlike other storage options, such as EBS, Storage Gateway, or EFS, which necessitate ongoing oversight and regular enhancements—like expanding disk size or improving I/O speed—S3 effectively manages these concerns automatically.
While users can enjoy the convenience of S3's scalability and low maintenance, one critical aspect still demands attention: security. AWS has implemented robust security measures, including default settings that enable S3 Block Public Access and disable access control lists (ACLs) for all newly created S3 buckets. This initiative aims to enhance security, allowing users to store objects with greater peace of mind.
In this article, we will examine frequent pitfalls users encounter when attempting to derive business value while inadvertently compromising the security of their S3 objects.
Common Security Mistakes

Accessing S3 Objects Publicly on the Internet
Despite the "security by default" policies AWS has instituted, users often seek to make certain S3 objects publicly accessible for various reasons, such as:
- Using images, CSS, or JavaScript files stored in S3 as website assets
- Sharing other file types with third parties
This frequently leads to users configuring their S3 buckets as public, along with all the objects contained within. While this approach may temporarily solve the issue of public accessibility, it violates AWS security best practices.
The simplicity of this method in the Amazon S3 Console can be misleading, as it poses significant security risks. If public access is necessary, there are more secure alternatives available.
Exploring Secure Sharing Options
There are several ways to share S3 objects securely:
- Generate a signed S3 URL that remains valid for a limited time.
- Create a signed CloudFront URL that is also time-sensitive.
- Utilize Origin Access Control (OAC) in CloudFront to restrict direct S3 access.
This article will specifically focus on the first and last options. Let’s dive into how to create a pre-signed URL on S3.
Getting Started with Pre-signed URLs
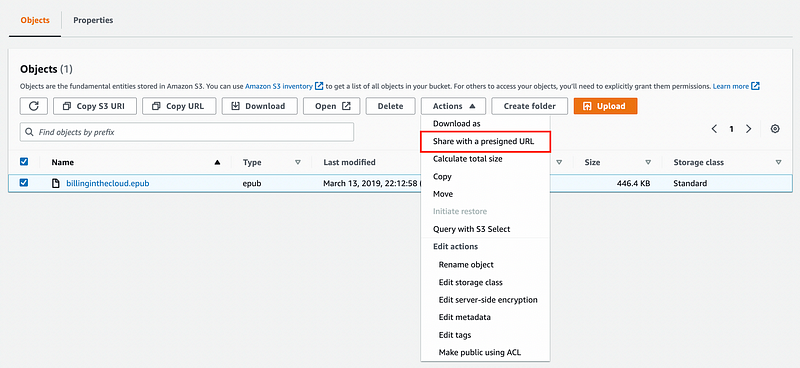
To ensure secure access to an object, the first step is to upload it to an S3 bucket. Once the object is uploaded, you can generate the URL by following these steps:
- Select the object/file you wish to share securely.
- Open the Actions drop-down menu.
- Click on the "Share with a pre-signed URL" option.

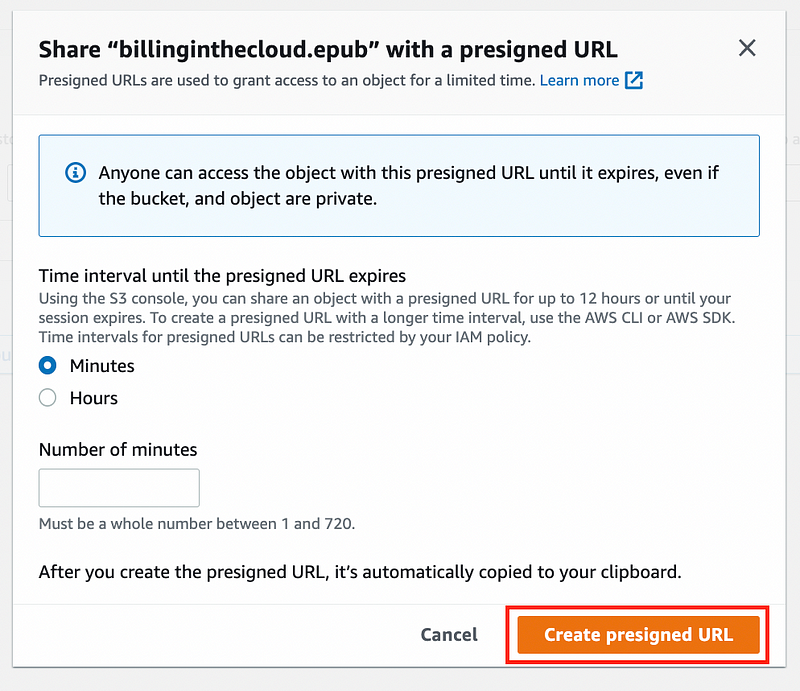
In the pop-up menu, configure the duration for which you want the URL to be valid.

After completing your configuration, click "Create pre-signed URL." The generated URL will be copied to your clipboard, and you can also find it in the top menu bar.
This pre-signed URL can be shared with third parties requiring access to the file. Note that after the specified time period, the link will expire.
Use Case: One common scenario is sharing a download link that will expire, thus providing limited-time access to the file.
Next, we will explore the broader application of CloudFront OAC for S3 objects.
Using CloudFront OAC for S3 Access
This method provides a comprehensive security solution for all objects within a bucket and is particularly effective when timely access is not a concern. Here’s how to set it up:
- Navigate to the AWS CloudFront Management Console.
- Click on the "Create Distribution" button.

- Select the Origin Domain, which is the name of the bucket you wish to make public. The Name will be auto-generated.
- Under Origin Access, choose "Origin Access control settings (recommended)."
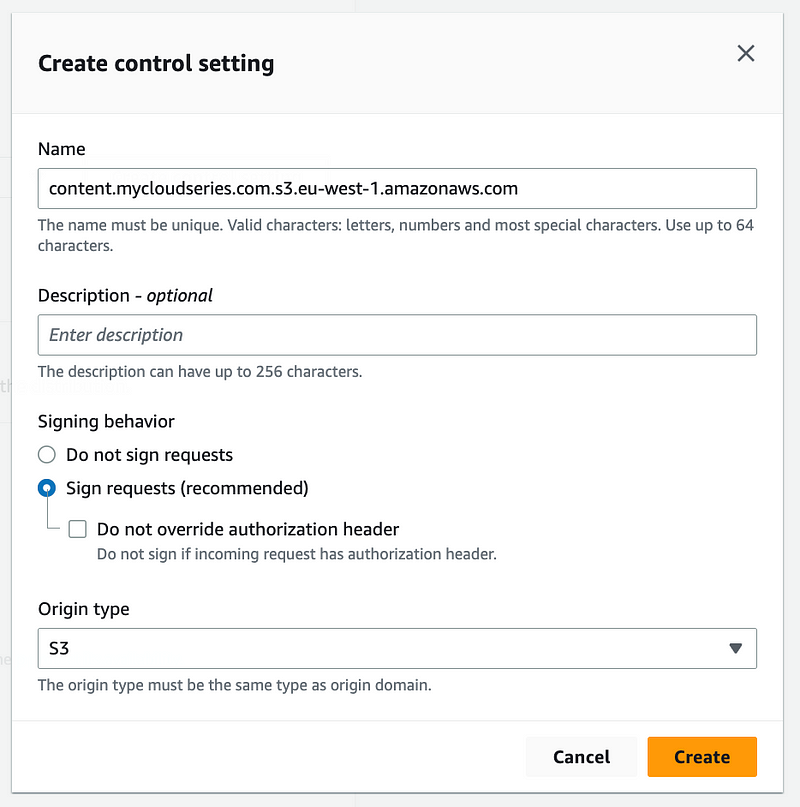
- Click on "Create control setting" to set up an Origin Access Control.

Leave all other entries unchanged and click the "Create" button to finalize the Origin Access Control (OAC) setup.
In the Web Application Firewall (WAF) section, you can choose "Do not enable security protections" for now. However, it is advisable to configure WAF for enhanced security in the future.
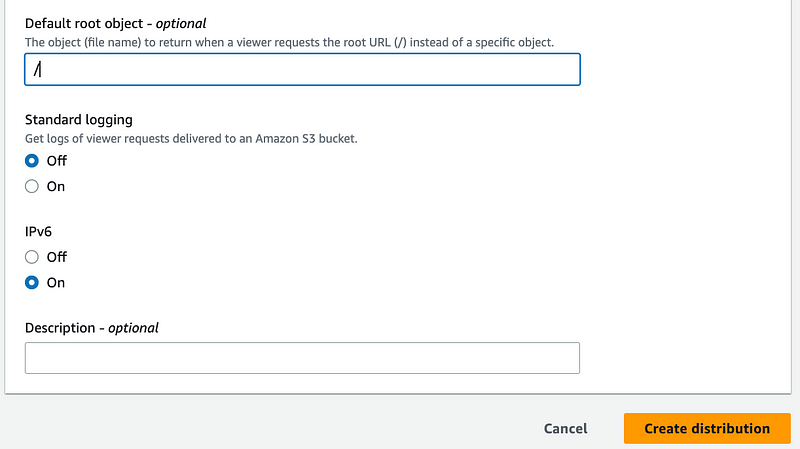
Set the Default root object to /, as shown below:

Finally, click "Create distribution." It will take a few moments to set up, and once completed, a URL will be generated.

To access any object in the S3 bucket, you can use the CloudFront URL combined with the object's name. For example, if you have a file named logos.png in S3, the URL would be: d3p5ntf06t2poh.cloudfront.net/logos.png.
CloudFront serves as a protective barrier against unwanted public access to your S3 buckets while also enhancing performance. The following section highlights additional benefits of using Amazon CloudFront.
Advantages of CloudFront
- Accelerates image load times by decoupling them from the main application loading process.
- Brings content closer to users through AWS’s Global Point of Presence (PoP) network.
For those who prefer visual aids, this video provides a comprehensive guide to the setup steps discussed in this article.
Conclusion
In this article, we explored secure methods for sharing data within Amazon S3 without making buckets publicly accessible. The first approach involved utilizing CloudFront, while the second focused on S3 Signed URLs. Both methods help ensure compliance with S3's security best practices and GDPR regulations, safeguarding your data effectively.
